Payment Integration WordPress: Ultimate Guide for Seamless Transactions
Here’s a practical, hands-on guide to getting your WordPress site set up to take payments. In today's market, you absolutely can't afford a clunky or insecure checkout. We'll skip the high-level theory and get straight to the actionable steps for integrating everything from go-to gateways like Stripe to modern crypto solutions like ATLOS.
Why Your Payment Gateway Is Your Most Important Asset
It’s easy to think of a payment gateway as just a technical tool, but it's much more than that. It's the final, critical handshake between you and your customer. This single moment can make or break a sale, and its performance has a direct line to your revenue and reputation. A slow, confusing, or untrustworthy checkout is one of the biggest reasons people abandon their carts.
This is exactly why a smart payment integration WordPress setup is such a big deal. You're not just collecting money; you're building a smooth, confident experience that encourages people to come back.
The Power of Choice and Flexibility
Offering a single way to pay just doesn't cut it anymore. Your customers expect to use the methods they're comfortable with, whether that's a credit card, a digital wallet like Apple Pay, or even cryptocurrency. The right integration puts you in control, letting you cater to all those different preferences.
Just think about the immediate benefits:
- Higher Conversion Rates: When people see a payment option they know and trust, there's less hesitation.
- Stronger Customer Trust: Simply showing the logos for reputable providers like Stripe or ATLOS boosts your site's credibility.
- Wider Global Reach: You can start accepting payments from customers around the world in their local currency or preferred digital asset.
- Staying Ahead of the Game: By embracing newer payment tech like crypto, you're not just keeping up—you're getting ahead.
Your payment gateway is the heart of your online store. It doesn't just process transactions; it shapes the customer's final impression of your brand. A smooth, secure process can turn a one-time buyer into a loyal advocate.
WordPress: The E-Commerce Engine
WordPress has grown so much from its early days as a simple blogging platform. Now, it's a true e-commerce powerhouse. As of 2025, WordPress runs an incredible 43.6% of all websites that use a content management system, which speaks volumes about its flexibility and the massive community behind it.
A huge part of this success comes from its plugin ecosystem, especially for e-commerce. Take WooCommerce, for example—it's the platform's top e-commerce plugin and works seamlessly with over 100 different payment gateways. This gives you the freedom to connect with both industry giants and niche providers, letting you customize your checkout for the best possible results. You can find more data on WordPress market share and trends if you want to dig deeper.
Choosing Your WordPress Payment Gateway
With so many options, picking the right gateway can feel overwhelming. To make it a bit easier, here’s a quick comparison of the most popular choices to help you decide what fits your business best.
| Gateway Type | Best For | Key Features | Typical Fees |
|---|---|---|---|
| Payment Aggregators | Startups & small businesses | Easy setup, all-in-one solution, no merchant account needed. (e.g., Stripe, PayPal) | 2.9% + $0.30 per transaction (domestic) |
| Merchant Account + Gateway | High-volume & established businesses | Better rates, more control, dedicated support. (e.g., Authorize.net with a bank) | 1.5%-3.5% + monthly fees + per-transaction fees |
| Crypto Gateways | Forward-thinking & global businesses | Low fees, no chargebacks, instant global settlement. (e.g., ATLOS, BitPay) | Typically 0.5%-1% flat fee |
| Direct Bank Transfers | B2B & high-ticket sales | No transaction fees from the gateway, very secure. (e.g., ACH, SEPA) | Varies by bank, often low flat fees |
Ultimately, the best choice depends on your sales volume, customer base, and how much control you want over the process. An aggregator like Stripe is fantastic for getting started quickly, while a crypto gateway like ATLOS opens up a new, tech-savvy audience with lower overhead.
Laying the Groundwork for Secure Transactions
Before you jump into installing a payment gateway, let's talk about the foundation. You can have the best payment integration WordPress offers, but if your site isn't rock-solid, you're building on shaky ground. Getting the basics right from the start is the difference between a smooth operation and a future full of headaches.
Think of it this way: you wouldn't build a bank on a sand dune. The security and stability of your WordPress site are that critical.
Encrypt All Data with an SSL Certificate
First things first: encryption. Any data moving between your customer's browser and your website—especially sensitive payment info—needs to be locked down tight. This is where an SSL certificate comes in.
An SSL (Secure Sockets Layer) certificate is what gives you the https:// at the start of your URL and that little padlock icon in the browser. It creates a secure, encrypted connection, scrambling the data so it's useless to anyone trying to snoop on it. Without it, you're basically sending customer details on a postcard.
Good news is, most quality web hosts now provide free SSL certificates (often from Let's Encrypt). Usually, it’s just a one-click install from your hosting dashboard. That padlock is a huge trust signal for shoppers, so make sure it's there.
A recent 2024 report highlighted that 78% of online shoppers actively look for security indicators before they'll even consider entering personal information. That padlock isn't just a nice-to-have; it directly impacts your sales.
Pick a Host That Won't Crumble Under Pressure
Not all web hosting is created equal. That cheap shared hosting plan that worked fine for your blog? It’s probably not going to cut it for a busy e-commerce store. A slow checkout process is a guaranteed way to lose customers.
When you're choosing a host for a site that processes payments, you need to look for a few key things:
- Rock-Solid Uptime: You want a provider that guarantees 99.9% uptime or better. Every minute of downtime is a minute you're not making money.
- Room to Grow: Can you easily scale your resources? You'll want the ability to handle traffic spikes during a big sale without your site slowing to a crawl.
- Dedicated Performance: Managed WordPress or VPS hosting plans are often a better bet because they give you dedicated resources. This means your site's performance won't get dragged down by a noisy neighbor on the same server.
This infographic breaks down the core pillars of a secure e-commerce setup. It all starts with SSL and a solid host.
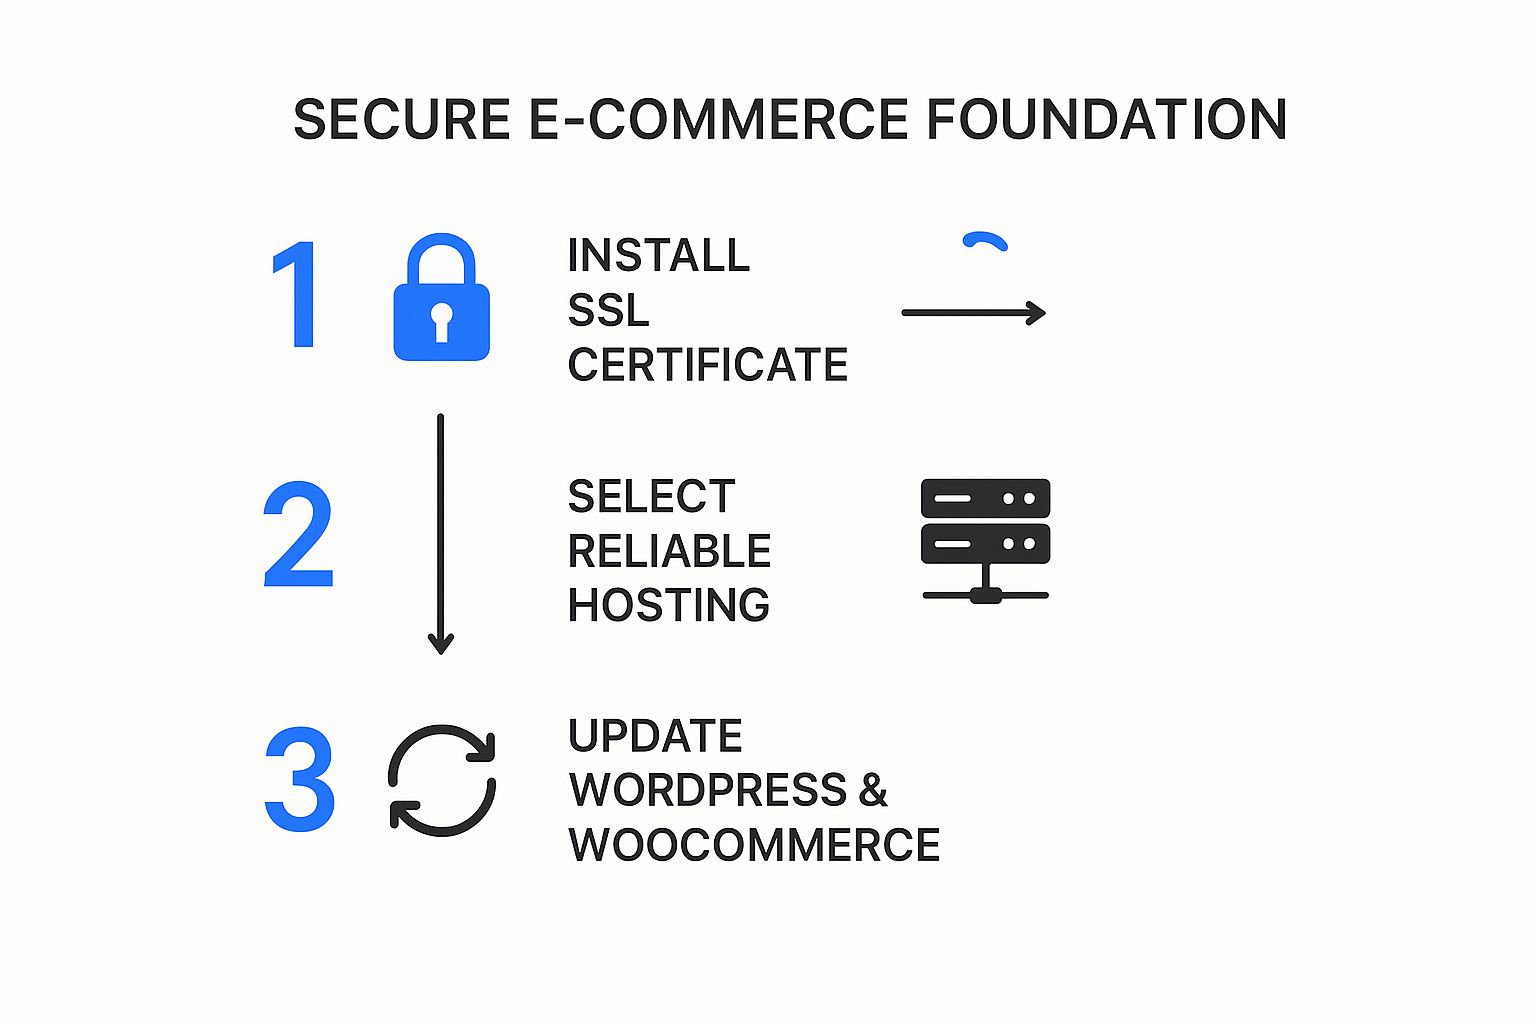
As you can see, each element builds on the last, creating layers of defense to protect your customer's data and your business.
Keep Everything Updated. No Excuses.
WordPress, along with your plugins and theme, gets regular updates for a reason. These aren't just for new features; they often contain critical security patches that fix vulnerabilities. Running outdated software is like leaving the back door of your shop unlocked overnight.
Protecting your API keys and other credentials is a massive part of this. For a deeper dive into this specific topic, it's worth learning about robust secrets management practices.
I recommend setting aside time once a week to run all your updates. I know it can feel a bit nerve-wracking—the fear of an update breaking something is real. But trust me, the risk of getting hacked because of an old vulnerability is far, far worse. Just make sure you run a full backup of your site before you hit that update button. That way, you always have a safe restore point if something goes sideways.
Alright, with your WordPress site locked down and secure, it's time to dive into the good stuff: integrating the actual crypto payment gateway. We're going to walk through setting up the ATLOS Crypto Payment Gateway, a solid choice for accepting digital currencies. I'll take you from finding the plugin all the way through the final configuration, making sure the whole process is as painless as possible.
First things first, we need to get the plugin installed.
I can't stress this enough: always, always download plugins directly from the official WordPress repository. Grabbing them from sketchy third-party sites is like leaving your front door wide open—it's one of the fastest ways to get your site compromised. The official directory is vetted and scanned, so you know you're getting clean code.
Finding and Installing the ATLOS Plugin
The most secure and straightforward way to add the ATLOS plugin is right from your WordPress dashboard. You don't need to be a developer to handle this part; the process is designed to be super user-friendly.
Here's the quick rundown:
- Log in to your WordPress admin area.
- From the main menu on the left, find Plugins and click on Add New.
- You'll see a search bar on the top right. Just type in "ATLOS Crypto Payment Gateway."
- The official plugin should pop right up. Click Install Now. After a moment, that button will change to Activate. Go ahead and click it.
Using the built-in search ensures you're getting the real deal, not some malicious copycat. Easy as that.
Connecting Your ATLOS Account with API Keys
With the plugin activated, the next step is to create a secure handshake between your website and your ATLOS account. This is done using API keys. Think of them as a special set of credentials that only your site and ATLOS know, allowing them to talk to each other securely.
You’ll need to grab two keys from your ATLOS dashboard: a Public Key and a Secret Key. That Secret Key is extremely sensitive. Treat it like gold—never share it, post it publicly, or store it somewhere insecure.
My Pro Tip: I've seen too many people get lazy with API keys. Use a password manager like 1Password or a dedicated secure vault. You wouldn't write your bank password on a sticky note, so don't do the equivalent with the keys that control your money.
Once you have your keys from ATLOS, head back to your WordPress dashboard. The settings are usually located under WooCommerce > Settings > Payments. You'll see ATLOS listed as a payment option. Just click "Manage" to get to the configuration screen where you can paste in your keys.
Configuring the Gateway for Your Store
API keys are in, so we're on the home stretch. Now it's time to tweak the settings to fit your store and make the checkout experience smooth for your customers. The defaults are okay, but a few small changes can make a big difference in customer trust and conversion.
Here are the key fields you'll want to adjust:
- Enable/Disable: This is your main on/off switch. Make sure it's checked to make ATLOS visible at checkout.
- Title: This is what your customers see. Instead of the generic "ATLOS," I highly recommend changing it to something more descriptive like, "Pay with Cryptocurrency (Bitcoin, Ethereum, etc.)." It removes any guesswork.
- Description: This text appears right below the title. Use it to reassure your customers. Something like, "Securely pay with your preferred crypto. We'll process your order instantly once the transaction is confirmed on the network."
- Wallet Address: This one is critical. Carefully enter the public wallet address where you want to receive payments. Triple-check it. Crypto transactions are irreversible, so a typo here means your funds are gone forever.
Spending just a few minutes on these settings transforms a standard payment option into a clear, professional part of your checkout flow. It’s this kind of attention to detail that helps build a successful payment integration on your WordPress site.
Crafting a Checkout Experience That Actually Converts
Simply installing the ATLOS plugin gets the job done, but it doesn't guarantee sales. A generic checkout process is functional, sure, but a thoughtfully designed one is what truly drives conversions and builds customer confidence. The small details you tweak in your payment integration wordpress setup can have a surprisingly big impact on your bottom line.
This is where you graduate from a basic setup to a refined experience that feels like a natural part of your brand. It’s about more than just accepting crypto; it’s about making the process so smooth that customers don't think twice. By customizing a few key elements, you can slash cart abandonment rates and make crypto payments feel like a secure, everyday option in your store.
First Impressions Matter: Customizing the Title and Description
When a customer lands on your checkout page, clarity is everything. The default "ATLOS" title works, but it doesn't tell them much. You can make an immediate improvement by being more descriptive.
Instead of the default, try something that makes perfect sense to a first-time buyer:
- Pay with Crypto (Bitcoin, Ethereum, etc.)
- Secure Cryptocurrency Payment
- Accepting Bitcoin & Major Altcoins
This simple text change eliminates any guesswork. The description field right below the title is your next opportunity to build trust. Use it to reassure customers and set clear expectations. A good description might say, "Your order is processed instantly after network confirmation. All payments are secured by the ATLOS gateway."
These minor text adjustments can transform a generic payment option into a professional, trustworthy choice.
Be Strategic: Curate Your Accepted Cryptocurrencies
One of the best features of the ATLOS gateway is choosing which cryptocurrencies to accept. While it might be tempting to flip the switch on every available coin, a more focused approach usually works better. You need to think about your specific audience.
Are you selling high-end tech? Your customers are likely most familiar with established coins like Bitcoin (BTC) and Ethereum (ETH). On the other hand, a store centered on gaming or digital art might get more traction by accepting coins popular within those communities.
By curating your crypto options, you reduce clutter and decision fatigue for the customer. A focused selection often performs better than an overwhelming list, signaling that you understand your specific customer base.
This targeted approach not only cleans up the user interface but also positions your brand as being in tune with what your audience actually uses. It's a small detail that shows you've put real thought into their experience.
Don't Underestimate the Power of a Logo
Never forget the visual power of a logo. In online payments, trust is the currency, and familiar symbols provide instant reassurance. The ATLOS plugin settings let you display the gateway's logo right next to the payment option on your checkout page.
Flipping this on does two important things:
- Builds Credibility: It connects your store with an established payment provider, adding a valuable layer of legitimacy.
- Offers a Visual Shortcut: It helps customers quickly spot the crypto payment option as they scan the page.
This is a one-click change that can subtly boost a customer's confidence at the most critical moment of their purchase. As WordPress continues to dominate e-commerce—with projections showing over 40% of online stores will run on WooCommerce by 2025—these details matter more than ever. This growth is driven by flexible payment gateways, and recognizable options are key. For instance, just adding a trusted name like PayPal can increase conversions by 25% in WooCommerce stores.
To truly maximize your checkout's effectiveness, it's worth understanding the broader principles of conversion. Diving into some actionable conversion rate optimization tips can provide insights that, when combined with a well-designed payment experience, create a powerful engine for sales growth.
Running Tests Before You Go Live
Launching a new payment gateway without testing it first is a rookie mistake you can’t afford to make. Think of it as a pre-flight check for your e-commerce store—it's an absolutely essential step to make sure your ATLOS setup works perfectly before any real crypto changes hands.
The great news is you don't have to risk a single satoshi. We're going to use the built-in "Test Mode" to run simulated purchases, allowing you to catch any glitches, from API errors to wonky order confirmations. This way, you can troubleshoot proactively and launch with complete confidence.
Flipping the Switch to Test Mode
Your first move is to put the ATLOS plugin into its sandbox environment. This is a safe, isolated space where you can process transactions that look and feel real but don't actually touch any live funds or the blockchain.
Head over to your WooCommerce settings (WooCommerce > Settings > Payments > ATLOS). You’ll see a checkbox for "Enable Test Mode." Go ahead and tick that. As soon as you do, you'll notice the fields for your live API keys are replaced by new ones for your Test API Keys.
Now, pop over to your ATLOS developer dashboard to grab these specific test keys. They are totally separate from your live keys and are meant only for testing. Copy and paste the Test Public Key and Test Secret Key into the right spots and hit save. Just like that, your store is ready to simulate crypto payments without any financial risk.
Your Pre-Launch Testing Checklist
With test mode fired up, it's time to put on your customer hat. The goal here is to walk through the entire buying experience, from browsing to checkout, keeping a sharp eye out for anything that feels off. Don't just do it once—run through a few different scenarios to be sure.
Here’s a practical checklist to make sure you cover all your bases:
- Add an Item to the Cart: Start simple. Pick a product, add it to the cart, and head to the checkout page.
- Select the ATLOS Payment Option: Does your custom title and description (e.g., "Pay with Cryptocurrency") show up correctly? It should look exactly as you configured it.
- Complete the "Purchase": Go through with the payment. Since you're in test mode, ATLOS will guide you through a simulated process. Just follow the on-screen prompts.
- Check for the Order Confirmation Page: After the fake payment, your site should pop you over to a "Thank You" or order confirmation page. Make sure it loads properly and shows the right order details.
- Verify the Order in WooCommerce: Jump back to your WordPress dashboard and navigate to WooCommerce > Orders. You should see a new order logged with a status like "Processing" or "Completed." Do the details match your test purchase?
A single successful test is good, but running several is even better. Try it with different products or user scenarios. This helps guarantee your payment integration is solid enough to handle real-world customer behavior.
Spotting Common Problems
During your tests, you aren't just looking for success—you're actively hunting for bugs. From my experience, a few common issues tend to pop up during a new payment integration WordPress setup. Knowing what to look for can save you a ton of headaches.
- API Connection Errors: If the checkout fails right away with an error message, your first suspect should be the API keys. Go back and double-check that you copied and pasted the Test keys perfectly. Even one wrong character will break the connection.
- Order Status Not Updating: Did the payment seem to go through, but the order in WooCommerce is still stuck on "Pending payment"? This almost always points to a webhook problem. It means ATLOS is having trouble talking back to your site to confirm the transaction.
- Incorrect Currency or Amount: Always verify that the amount and crypto displayed at checkout perfectly match the product's price. If they don't, you likely have a configuration issue somewhere in the settings.
The payment processing space is dominated by titans like PayPal, which holds 25.8% of the market, and Stripe, with 23.4%. These platforms have set a high bar, making their integration with tools like WooCommerce and WP Simple Pay incredibly smooth. For instance, WP Simple Pay is built for Stripe and seamlessly adds features like Apple Pay and Google Pay, helping platforms like WooCommerce grow to power 9.1% of all online stores. You can find more about these online payment trends and see what customers have come to expect.
Once you’ve run through these checks and feel confident that everything is running smoothly, you're ready for the final step. It’s time to disable Test Mode, plug in your live API keys, and get ready to accept real crypto payments from your customers.
What to Do When Things Go Wrong
Even the smoothest payment integration WordPress project can hit a bump in the road. It happens. The good news is that most glitches with the ATLOS gateway are pretty simple to solve once you know what you’re looking for. Think of this as your go-to guide for squashing those little bugs before they turn into major headaches.
We'll walk through the most common culprits, from API keys that won't connect to orders that refuse to update. This isn't about guesswork; it's a practical checklist to get your checkout running smoothly again with minimal disruption to your customers.
The Dreaded API Connection Failure
One of the first things to go wrong is often the connection between your store and ATLOS. You might see a frustrating error message at checkout, or maybe the ATLOS payment option just disappears entirely. In my experience, nine times out of ten, the problem is a simple typo in your API keys.
Before you start digging deeper, head straight back to WooCommerce > Settings > Payments > ATLOS. Double-check, then triple-check your API Public and Secret Keys.
- Watch for extra spaces. It’s so easy to accidentally copy a space at the beginning or end of a key.
- Are you in the right mode? Make sure you’re using your live keys for your live site and test keys when you're in test mode. It’s a classic mix-up that will always cause a connection failure.
- Is a firewall blocking the way? Every now and then, an overzealous security plugin or a strict server firewall can block the outgoing connection to ATLOS. A quick way to test this is to temporarily disable your security plugin. If that solves it, you’ve found the cause and will need to whitelist the ATLOS API endpoints.
"My Customer Paid, but the Order Is Still Pending!"
This one is a classic. A customer pays, the crypto is sent, but their order in WooCommerce is stuck on "Pending payment." This almost always means there’s an issue with your webhooks. The webhook is the digital messenger that ATLOS uses to tell your website, "Hey, this order was paid for!" If that message never arrives, your store is left in the dark.
The first step is to check the webhook URL in your ATLOS dashboard. It needs to be an exact match to the one shown in your ATLOS plugin settings inside WordPress.
A broken webhook is like a delivery notification sent to the wrong address. The package (your payment confirmation) was sent, but your store never received it. Ensuring the webhook URL is correct is the single most important step for reliable order updates.
If the URL is perfect, the next likely suspect is, once again, a firewall or security plugin blocking the incoming message from ATLOS.
A Few Other Common Glitches
Beyond API keys and webhooks, a couple of other minor issues can pop up. Here's a quick rundown of what to look for.
| Problem Scenario | What Might Be Happening | How to Fix It |
|---|---|---|
| Incorrect Amount at Checkout | WooCommerce's currency or pricing settings are likely misconfigured. | Pop into your store's settings and confirm the default currency. Also, check if another plugin is accidentally changing prices at checkout. |
| Gateway Isn't Showing Up | The ATLOS gateway might be disabled for the customer's specific shipping zone or currency. | Head back to the ATLOS settings and see if you've set any restrictions based on location or currency. |
| Error After a WordPress Update | The ATLOS plugin could be clashing with the newest version of WordPress or WooCommerce. | Look for an update to the ATLOS plugin itself. Good developers usually push out compatibility patches quickly after major core updates. |
By working through these common issues one by one, you can usually solve most integration problems in just a few minutes. This keeps your crypto checkout process reliable and your business running without a hitch.
Got Questions? We've Got Answers
Stepping into the world of crypto payments on your WordPress site can feel like new territory. It's natural to have a few questions. Here are some of the most common things people ask when getting started with the ATLOS gateway.
Do I Really Need WooCommerce to Use ATLOS?
Yes, you do. The ATLOS Crypto Payment Gateway isn't a standalone system; it's built specifically to work as an add-on for WooCommerce.
Think of it this way: WooCommerce is the engine that runs your online store, and ATLOS is the specialized fuel pump that lets it accept cryptocurrency. You'll need WordPress and a functioning WooCommerce setup before you can plug ATLOS in.
Just How Secure Are Crypto Payments?
They're incredibly secure, and this is by design. The connection between your site and ATLOS is protected using secure API keys, and all the data that flows through is fully encrypted.
Beyond the plugin's own security, remember that cryptocurrency transactions have a unique advantage over credit cards. They're recorded on a public blockchain, which virtually eliminates common issues like fraudulent chargebacks. For maximum security, always make sure your website is running on HTTPS with a valid SSL certificate.
What's the Deal with Fees?
Like any payment processor, there are a couple of small fees involved. It’s pretty straightforward, and there are no surprises.
- Processing Fee: ATLOS charges a small percentage for each successful transaction it processes. This is a standard practice for payment gateways.
- Network Fee: This is what's often called a "gas fee" in the crypto world. It's a small charge required by the blockchain network itself (like Bitcoin or Ethereum) to process a transaction. Your customer typically covers this part.
Fee structures can change over time, so for the most up-to-date numbers, it's always a good idea to check the official ATLOS website directly. That way, you know exactly what to expect.
Ready to give your customers a modern, secure, and direct way to pay? Integrate the ATLOS Crypto Payment Gateway today and open your store to the future of e-commerce. With no KYC and an instant setup, you can be up and running in minutes. Find out more at https://atlos.io.