Your Guide to Crypto Payment API Integration
Before you even think about writing a single line of code, let's talk about the why. Why should your business even consider accepting cryptocurrency? This isn't just about chasing a trend. It's a calculated move to tap into a global pool of tech-forward customers, drastically cut down on those pesky transaction fees, and use blockchain's inherent security to your advantage.
Why Accept Crypto Payments Now?

Adding a crypto payment API is so much more than sticking another button on your checkout page. It’s about getting your brand ready for what's next in e-commerce and finance. The appetite for decentralized payment options is exploding as people look for faster, cheaper, and more private ways to spend their money online.
For any business, this shift is a massive opportunity to get ahead of the curve and give customers what they want. By plugging in a crypto payment gateway, you’re opening your doors to a growing audience that actively prefers using digital assets.
Tap Into New Markets and Slash Your Costs
Let's get straight to one of the biggest wins: significantly lower transaction fees. Traditional payment methods, especially credit cards, will skim 2-3% off every single transaction. That adds up quickly and eats directly into your profit, particularly if you're dealing with high volume or big-ticket items.
Now, compare that to a crypto payment API. You’re typically looking at fees somewhere between 0.5% and 1%. This isn't just a small saving; it's a game-changer for your bottom line. The difference is even more stark for international sales, where you can sidestep the usual cross-border fees and currency conversion headaches.
Beyond the savings, crypto lets you operate on a truly global scale. You can accept a payment from someone on the other side of the world just as easily as you can from someone next door. No more waiting on slow bank transfers or wrestling with exchange rates. It's a borderless system built for international growth.
The Decentralized Finance Movement is Here
The entire Web3 ecosystem is booming, and with it, the adoption of digital currencies has skyrocketed. This isn't just a niche corner of the internet anymore; you can see the scale of this shift in the latest Web3 statistics. It all points to a growing desire for more control and security over personal finances.
When you integrate a crypto payment API, you're sending a clear signal. You’re telling a forward-thinking audience that your business is modern, innovative, and understands the principles of a decentralized economy. It’s a huge trust-builder with a new generation of buyers.
The market data backs this up. The Crypto APIs market is on a steep upward trajectory, projected to hit USD 1,074 million by 2025 and an incredible USD 7,955.7 million by 2035. That's a compound annual growth rate (CAGR) of 22.2%. This kind of rapid expansion is a clear indicator that the time to act is now.
Before you write a single line of code, it's crucial to get your house in order. A smooth integration process is built on a solid foundation.
Setting the Stage: Your Development Environment

I've seen it countless times—a developer dives headfirst into coding an API integration only to hit a wall because of a poorly configured environment. Getting your crypto payment API up and running doesn't start with the first API call. It begins with a well-thought-out setup. This is your pre-flight check, and skipping it is a recipe for headaches down the road.
First things first, you'll need a developer account with your provider. In our case, that's ATLOS. It’s a quick sign-up process that gets you into the dashboard, which will become your mission control. This is where you'll generate your API keys—a public key and a secret key.
Think of these keys as the credentials your app uses to talk to the API. It's absolutely critical to protect your secret key as if it were a password. It should never, ever be visible in client-side code or committed to a public GitHub repository. This one simple habit prevents almost all unauthorized access.
Getting Your Local Workspace Ready
With your API keys secured, it's time to build your local workspace. You need a safe, isolated area to test and tinker without impacting any live systems. For a Python project, this usually means setting up a virtual environment. If you're in the Node.js world, you'll be managing your dependencies with a package.json file.
To start interacting with the API, you'll want to install the tools that make life easier. Most reputable providers, including ATLOS, offer Software Development Kits (SDKs). These are just pre-packaged libraries that handle all the tedious stuff like HTTP requests and authentication, letting you focus on the important logic.
For instance, if you're building a Node.js backend, you'd just run this command in your terminal:
npm install @atlos/sdk
This command fetches the package and adds it to your project, making its functions ready to use. For the Python folks, the equivalent would be:
pip install atlos-sdk
A well-organized local environment is your best friend for quick testing and iteration. My number one tip is to always use environment variables for your API keys instead of hardcoding them. It makes switching between your test and live keys a breeze and is just solid security practice.
Making a Few Key Decisions Up Front
Beyond the technical setup, there are a few strategic decisions you need to make before coding begins. These choices shape how the integration will actually work for your business and your customers. Thinking through this now saves a ton of refactoring later.
Ask yourself these questions:
- Which cryptocurrencies will we accept? Starting with the big names like Bitcoin (BTC) and Ethereum (ETH) is a safe bet. But don't forget stablecoins like USDC, which are great for customers who want to avoid price swings. The right mix really depends on who you're selling to.
- What's our settlement plan? Do you want to hold onto the crypto you receive in your own wallet? Or would you rather have the service automatically convert payments to a fiat currency (like USD) and send it straight to your bank account?
- How do we define a "complete" payment? You'll need to decide how many blockchain confirmations are required before you fulfill an order. It's always a balancing act between transaction speed and security.
Getting clear answers to these questions creates a blueprint for your integration logic. It ensures the system you build is the one your business actually needs.
Creating Your First Payment Request
Alright, with your environment set up, it's time for the fun part: generating your first actual crypto payment request. This is where your app talks to the ATLOS API to kick off a transaction. It's much simpler than you might think. The main goal here is to send a request with your order details and get back a payment address to show your customer.
Let's walk through this using a real-world example. I'll use a Node.js backend with Express, which is a pretty common stack for e-commerce sites. But don't worry if you're using a different language—the logic is the same. You're just bundling up some data and sending it to an API endpoint.
The flow is simple: you gather order details, package them into a format the API understands, and then process the response. This infographic gives a great high-level view of how your application and the ATLOS API communicate.
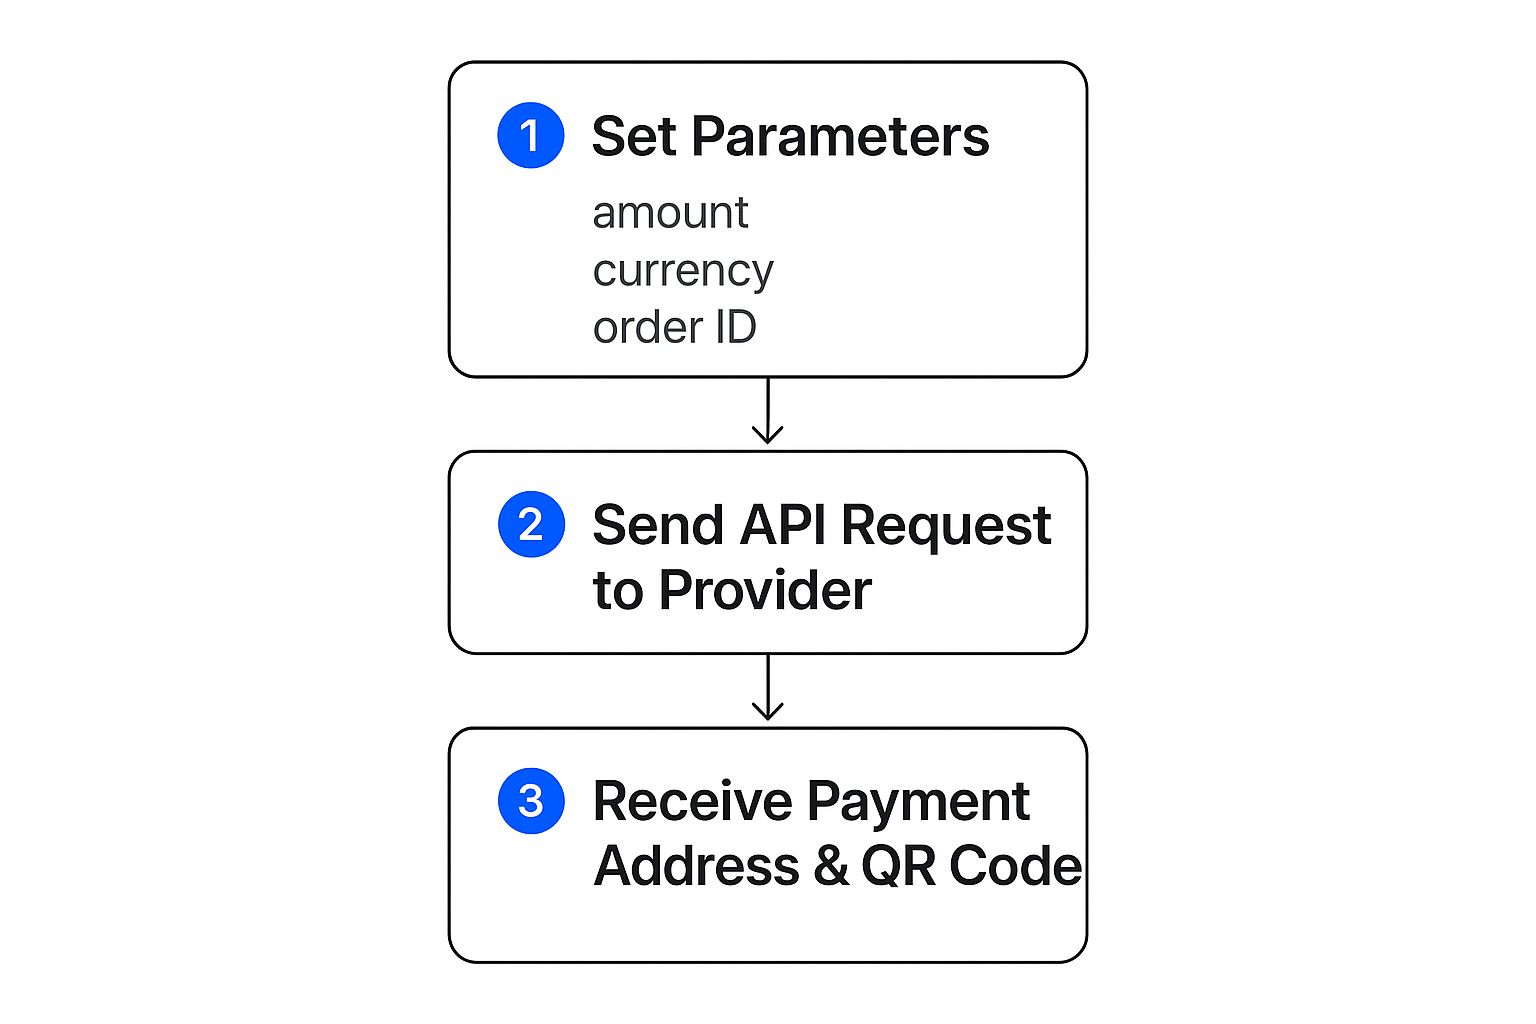
As you can see, it's a basic request-response cycle that gives your app all the info it needs for the customer to make a payment.
Structuring The API Call
Building the API request is the core of this whole integration. To process a payment correctly, you need to provide a few key pieces of information. Think of them as the essential ingredients for your transaction.
Here’s what you absolutely have to include in your API call:
- Amount: The total price in your chosen fiat currency (e.g., 19.99).
- Currency: The three-letter ISO code, like
USDorEUR. - Order ID: Your system’s unique identifier for this order (e.g.,
ORDER-12345). This is super important for reconciling payments later. - Callback URL: The URL on your server where ATLOS will send status updates. We’ll get into the weeds on this in the next section about webhooks.
A little tip from my own experience: always generate and save your internal
orderIdbefore you make the API call. If the request to ATLOS fails for any reason, you'll still have a record of the attempted transaction in your own system, which makes debugging and retrying a thousand times easier.
A Practical Code Example
Now, let's look at what this looks like in actual code. Here's a simple Express route that creates a new payment request when a customer hits "checkout." This snippet uses the ATLOS SDK to build and send off the request.
// Import the ATLOS SDK and Express const atlos = require('@atlos/sdk')('YOUR_SECRET_API_KEY'); const express = require('express'); const app = express(); app.use(express.json());
// Endpoint to create a new payment request
app.post('/create-payment', async (req, res) => {
  try {
    const { amount, orderId } = req.body;

    const payment = await atlos.payments.create({
      amount: amount, // e.g., 25.50
      currency: 'USD',
      order_id: orderId, // e.g., 'CUST-007-PROD-A'
      callback_url: 'https://yourstore.com/webhooks/payment-status'
    });

    // Send the payment details back to the frontend
    res.status(200).json({
      paymentId: payment.id,
      paymentAddress: payment.address,
      qrCodeUrl: payment.qr_code_url,
      expiresAt: payment.expires_at
    });

  } catch (error) {
    console.error('API Error:', error);
    res.status(500).send('Failed to create payment request.');
  }
});
app.listen(3000, () => console.log('Server is running on port 3000'));
Once your frontend gets this response, it has everything it needs to display a complete payment interface: the unique crypto address for this specific transaction and a QR code URL. The customer just scans the code or copies the address, sends their crypto, and your integration is officially live.
Handling Webhooks and Verifying Transactions

If you only take one thing away from this guide, let it be this: never trust the frontend alone to confirm a payment. A "payment complete" message on the user's screen is great for their experience, but it’s not your system's source of truth. For your business, the only confirmation that matters comes from a secure, server-to-server call from ATLOS.
This is where webhooks come into play. Think of a webhook as an automated tap on the shoulder from the ATLOS servers to yours, letting you know something important has happened. As a transaction progresses, ATLOS will send your backend real-time updates—moving from pending to confirmed, or in some cases, failed.
Building a solid listener for these webhooks isn't just a good idea; it's a non-negotiable part of a professional payment integration. This is the mechanism that tells your system to fulfill an order, update your database, and ship a product. It's how you ensure you only act on fully verified transactions.
Setting Up a Secure Webhook Listener
First things first, you need to create a dedicated endpoint on your server. This is the callback_url you specified during setup, and its sole job is to listen for incoming POST requests from ATLOS.
The data you'll receive is a simple JSON payload, but it's packed with crucial information like the order_id and the new status. Your backend code will use this order_id to find the matching order in your database and update its state.
Getting this right is more important than ever. With over 32,000 online merchants now accepting crypto—a 38% jump in e-commerce adoption—the need for robust backend practices is critical. Projections show that 40% of global consumers could be using crypto payment options by 2025, and you need a secure system to handle that volume. These crypto payment statistics paint a clear picture of where the market is headed.
Crucial Security Check: Always verify the webhook's signature. Every request from ATLOS includes a unique signature in its headers, which is generated using your secret API key. Your code must recalculate this signature on your end and confirm it matches the one received. This simple step is your guarantee that the webhook is genuinely from ATLOS and hasn't been faked or altered in transit.
Processing Transaction Statuses
Once you've authenticated the webhook, you can trust the data inside. The status field is the most important piece of the puzzle, telling you exactly where the payment stands. Your system's response will branch out based on the status you receive.
To help you get started, here's a quick look at the common statuses your webhook listener will see from the ATLOS API. Think of this as a cheat sheet for building your backend logic.
Common Crypto API Webhook Statuses
A quick reference for the common status codes your webhook listener will receive from the ATLOS Crypto Payment API, indicating the state of a transaction.
| Status Code | Meaning | Action Required |
|---|---|---|
| pending | The payment has been initiated but is awaiting sufficient blockchain confirmations. | Update order status in your system. Hold off on any fulfillment. |
| confirmed | The transaction is fully validated on the blockchain. | This is your green light. Mark the order as paid and trigger your fulfillment process. |
| failed | The payment was unsuccessful due to an error. | Update the order to 'failed' or 'cancelled'. Consider notifying the customer. |
| expired | The customer did not complete the payment within the allotted time. | Update the order to 'cancelled'. You can offer the customer a chance to try again. |
Handling these different states is what transforms your integration from a simple button into an automated, reliable order management system. This server-side verification is the backbone of a professional setup, giving you the security and accuracy needed to run your business with confidence.
Taking Your Crypto Payments Live
Alright, you’ve got the basics working in a sandbox. Now it’s time for the real deal: moving your crypto payment integration into a live, production system. This is a huge leap. It’s no longer just about getting code to execute; it’s about building a system that’s tough, secure, and ready for real customers with real money on the line.
The crypto payment space is blowing up. We’re looking at a market projected to grow from $1.69 billion in 2024 to an expected $4.07 billion by 2029. As more people start paying with crypto, their expectations for a smooth, secure process will only get higher. You can dig into the full crypto payment gateway market forecast on The Business Research Company's website.
What does that mean for you? It means your system can’t be fragile. It has to handle curveballs without falling apart.
What Happens When Things Go Wrong?
Let’s be realistic: APIs sometimes go down. What happens if your crypto payment provider has a hiccup right when a customer is trying to check out? A professional-grade system is ready for this. You need to have solid error handling and fallback plans in place so the user experience doesn't tank.
Picture this: a customer is at the final step, and your API call to generate a payment address fails. A generic error page is the last thing you want to show them. Your system needs to be smarter.
- Try, Try Again: For temporary network glitches, build in some logic to automatically retry the API request a couple of times with a slight delay.
- Have a Plan B: If the API is genuinely unavailable, give the user a clear, helpful message. Something like, "Our crypto payment option is temporarily unavailable. Please try again in a few minutes or choose another way to pay."
- Sound the Alarm: Set up automated alerts that ping your dev team the moment API failures start piling up.
This kind of planning saves sales and keeps your customers from losing faith when the unexpected happens.
My number one piece of advice for any production system is to assume things will break. Code defensively. Log everything. When you get that first frantic support ticket, having detailed logs of API requests, responses, and errors will be the difference between a five-minute fix and a five-hour headache.
Nailing the User Experience
A fantastic payment experience boils down to communication. People get nervous when they don’t know what’s happening with their money. The best way to ease that anxiety is with real-time status updates.
When a customer sends their crypto, the payment isn't instant. You should use the webhooks from your crypto payment API to show them exactly what’s going on, right on your checkout or order page. Think about displaying simple, clear messages like:
- "Payment Detected": The moment the transaction hits the network.
- "Awaiting Confirmation": While the blockchain is doing its validation work.
- "Payment Confirmed!": Once everything is verified and complete.
This kind of transparency keeps customers in the loop and dramatically cuts down on "Did my payment go through?" support tickets.
Finally, let’s talk security. Never, ever hardcode your API keys directly into your application. It’s a massive security risk. The standard, and safest, practice is to store your secret keys as environment variables on your server. This simple step keeps your credentials separate from your codebase, making it much harder for them to be accidentally exposed. It's a non-negotiable for any production environment.
Answering Your Top Integration Questions
Even the most straightforward API documentation can leave you with a few lingering questions, especially when you're getting your hands dirty with a crypto payment API for the first time. We've compiled the most common queries we hear from developers and business owners to clear up those final hurdles.
How Do You Handle Crypto Price Volatility?
This is, without a doubt, the number one concern for most merchants. With crypto values swinging, how can you be sure you’ll get paid the right amount?
The solution is actually quite elegant. Modern crypto payment APIs lock in the exchange rate for a set amount of time—usually 15 to 30 minutes—the moment a customer goes to pay. This creates a stable window for them to complete the transaction, effectively shielding both you and your customer from any sudden market dips or spikes that might happen during that period.
What Are the Typical API Fees?
One of the biggest wins with crypto payments is the cost. Traditional credit card processors are known for taking a significant cut, often 2-3% of every single sale. A crypto payment API operates on a much leaner model.
You can typically expect transaction fees to fall somewhere between 0.5% and 1%. For any business, but especially those with high volume or a global customer base, that difference is huge. It adds up quickly and goes straight back to your bottom line.
The fee structure is a game-changer. It’s not just about pocketing a little extra on each transaction; it’s about fundamentally improving your financial efficiency and reclaiming capital that would otherwise just disappear into processing fees.
How Do Merchants Get Their Funds?
Flexibility is the name of the game here. A well-designed crypto payment API should give you options that fit how you want to run your business. Generally, you’ll have two primary choices for settlement:
- Direct to Wallet: You can have all cryptocurrency payments sent straight to your company's digital wallet. This is perfect if you want to hold onto the crypto as an asset or use it to pay other vendors in your supply chain.
- Automatic Fiat Settlement: If you'd rather not deal with crypto directly, you can have the API provider instantly convert the payments into a fiat currency (like USD or EUR). The funds are then deposited right into your business bank account, completely removing any volatility risk on your end.
And as you set things up, remember that keeping your integration secure is paramount. It’s always worth brushing up on best practices for securing your API keys.
Ready to simplify your crypto payments? ATLOS Crypto Payment Gateway offers a seamless, no-KYC integration that lets you start accepting payments almost instantly. Get started today at https://atlos.io.