A Guide to Payment Gateway API Integration
So, you're ready to get your hands dirty with a payment gateway API integration. This guide is for developers and business owners who want to move past the theoretical stuff and build a real, working payment system right into their platform. We'll be using the ATLOS Crypto Payment Gateway API as our example to give you a practical, step-by-step roadmap.
Building Your E-Commerce Payment Engine
At its core, a payment gateway API integration is how you connect your website or app to a payment processor. It’s like constructing a secure digital bridge. This bridge lets your customer's payment information travel safely from your checkout page, through the payment network, and back again with an approval or decline.
This connection is the magic that makes real-time transaction approvals, fraud screening, and secure data handling possible. Without a direct integration, you're stuck with manual invoicing or clunky redirects that send your customers off-site to pay—a known killer of conversion rates. Getting this right means you can automate the entire payment flow from start to finish.
The Power of Direct Integration
For any online business, but especially for fast-paced industries like gaming or SaaS, implementing a direct payment gateway API integration is a game-changer. The advantages are clear and immediate.
- Total Brand Control: You keep your customers on your website for the entire checkout. This creates a smooth, cohesive experience that builds trust.
- Enhanced Flexibility: You can manage all sorts of payment methods through one system—from standard credit cards to cryptocurrencies like Bitcoin and Ethereum.
- Real-Time Data Access: Get instant updates on every transaction. This lets you automate everything from order confirmations and inventory adjustments to sending out digital receipts.
Mastering this integration isn't just about adding a "pay" button. You're actually building a critical piece of your e-commerce infrastructure—one that has a direct impact on your revenue, customer happiness, and how smoothly your business runs.
Preparing for a Successful Integration
A solid integration doesn't start with the first line of code. It begins with careful preparation. Taking the time to get organized upfront is the single biggest difference between a smooth rollout and weeks of painful, frustrating debugging. It’s about gathering your credentials, understanding the tools available, and setting up a secure space to build and test.
Think of it as laying the foundation for a house. You wouldn't start building walls without a solid base, and the same principle applies here.
Your first move is to get your ATLOS merchant account set up. After registering, you'll get access to the merchant dashboard, which is basically your mission control for this whole process. This is where you'll find the most important piece of the puzzle: your API keys.
Locating Your API Credentials
Once you’re in the ATLOS dashboard, look for a section labeled "Developer" or "API Settings." You’ll find two separate sets of keys waiting for you:
- Sandbox Keys: These are your playground. Use them for all your development and testing. They let you simulate transactions and hammer the API with test calls without touching real money.
- Production Keys: This is the real deal. These keys are for processing actual customer payments and must be protected like the keys to your kingdom.
It’s crucial to start only with your sandbox keys. This keeps you from accidentally charging a real credit card while you're still figuring things out. A pro tip is to store these keys as environment variables in your project, rather than hardcoding them directly into your application's source code. It's far more secure.
I’ve seen it happen more than once: a developer pushes code to the live server but forgets to switch from sandbox to production keys. The result? Every transaction fails. Always make "verify production keys" a mandatory item on your deployment checklist.
Mastering the API Documentation
With your keys secured, your next stop is the official ATLOS API documentation. This isn't just suggested reading; it's your bible for this project. Good documentation will clearly spell out every endpoint, what request methods to use (POST, GET, etc.), the parameters you need to send, and what the JSON responses will look like.
Before you go any further, spend some real time getting familiar with the core functions. Look for the endpoints that create payments, check a transaction's status, and handle refunds. Truly understanding how these work will save you an incredible amount of time later on.
Setting Up Your Development Environment
Alright, time to get your workshop in order. A proper development setup isn't a luxury; it's essential for working efficiently.
First, grab an API testing tool. I personally use Postman, but Insomnia is another great option. These tools let you send requests directly to the ATLOS API endpoints with your sandbox keys. You can tinker with request bodies, see exactly what the server sends back, and confirm everything works before writing a single line of application code. It makes debugging a breeze.
Next, you'll want to pick the right Software Development Kit (SDK) for your stack. ATLOS offers official SDKs for several common languages, making your life much easier.
- Python
- Node.js
- PHP
These SDKs are libraries that take care of the heavy lifting, like authentication and formatting requests. Instead of building everything from scratch, you can use simple functions native to your language. Using the right SDK cuts down on boilerplate code and dramatically reduces the chance of silly mistakes.
Establishing Secure API Communication
With your development environment set up, it's time to tackle the most critical part of any payment gateway integration: creating a secure line of communication. Security isn't just a nice-to-have feature; it's the absolute bedrock of a trustworthy payment system. Every single call your application makes to the ATLOS API has to be authenticated to prove it’s genuinely from you and has the right to perform the requested action.
This process establishes an encrypted, trusted channel between your platform and the ATLOS gateway, making sure sensitive data is shielded from prying eyes. Without solid authentication, you're leaving the door wide open for fraud.

Authenticating Your API Requests
The ATLOS API keeps authentication straightforward but highly effective by using your secret API keys. For every request your application sends, you need to include this key in the request headers. Think of it as your application's digital signature, instantly verifying its identity.
Typically, you'll do this using an Authorization header with the Bearer token scheme. This header simply tells the ATLOS server that the request is accompanied by your secret key.
Here’s what that looks like in a real-world cURL command:
curl https://api.atlos.io/v1/payments
-H "Authorization: Bearer YOUR_SECRET_API_KEY"
-d amount=1000
-d currency="USD"
In that example, YOUR_SECRET_API_KEY is where you'd slot in the actual key from your ATLOS dashboard. If you forget this header or use the wrong key, the API will immediately shut down the request with a 401 Unauthorized error.
A classic mistake I’ve seen developers make is accidentally exposing their secret keys in client-side code, like JavaScript. Never, ever do this. Your secret key must only be used in server-to-server communication where it can't be stolen and abused.
To handle different security needs, ATLOS provides a few authentication methods. The table below breaks down the main options and when you should use them.
ATLOS API Authentication Methods
| Authentication Method | How It Works | Primary Use Case |
|---|---|---|
| Secret API Key | A secret key included in the Authorization header as a Bearer token. | All server-to-server API calls for creating payments, managing customers, and other core functions. |
| Webhook Signing Secret | A separate secret used to generate a cryptographic signature for webhook events. | Verifying that incoming webhook notifications are genuinely from ATLOS and have not been tampered with. |
| Publishable API Key | A public key used in client-side code (e.g., JavaScript) for non-sensitive operations. | Initializing client-side SDKs or tokenizing payment information directly from the user's browser. |
Each key serves a distinct purpose, creating layers of security that protect both you and your customers.
The Growing Importance of API Security
The intense focus on secure API communication is part of a much larger industry trend. The API management market, which includes payment gateways, is experiencing massive growth. In 2024, this market was valued at $6.63 billion and is projected to hit an astounding $51.11 billion by 2033, growing at a 24.20% CAGR. This explosion is fueled by the rush toward digital transformation and the non-negotiable need for secure, reliable connections between different systems. You can dive deeper into these API market trends on imarcgroup.com.
Securing Your Webhook Endpoints
While API keys protect the requests you send to ATLOS, you also need a way to secure the messages ATLOS sends to you. That’s where webhooks come in. These automated notifications give you real-time updates on payment statuses, like 'succeeded' or 'failed'.
But how can you be sure a webhook notification is actually from ATLOS and not a bad actor trying to spoof a transaction?
The solution is signature verification. When ATLOS sends a webhook, it includes a special header with a unique signature. This signature is created using a dedicated webhook signing secret and the content of the webhook itself.
To validate the webhook, your application needs to follow these steps on your end:
- Receive the webhook notification at your server endpoint.
- Pull the signature out of the request header.
- Use your webhook signing secret to generate your own signature from the received payload.
- Compare the signature from the header to the one you just created.
If the two signatures match, you can trust the webhook is authentic. If they don’t, you should immediately discard the request. This validation step isn't optional—it's essential for a secure and dependable payment workflow.
Executing Core Payment Workflows
Once you've established a secure connection, it's time for the fun part: making the payment gateway API integration actually handle transactions. This is where the rubber meets the road. You’ll be managing the entire journey of a payment—from the moment a customer clicks "buy" to the final confirmation that funds have landed and you can ship their order. The main loop here involves creating payment intents, confirming them, and listening for updates.
The whole process, from grabbing your API keys to going live, can feel complex. This chart breaks it down into a clear, high-level flow.
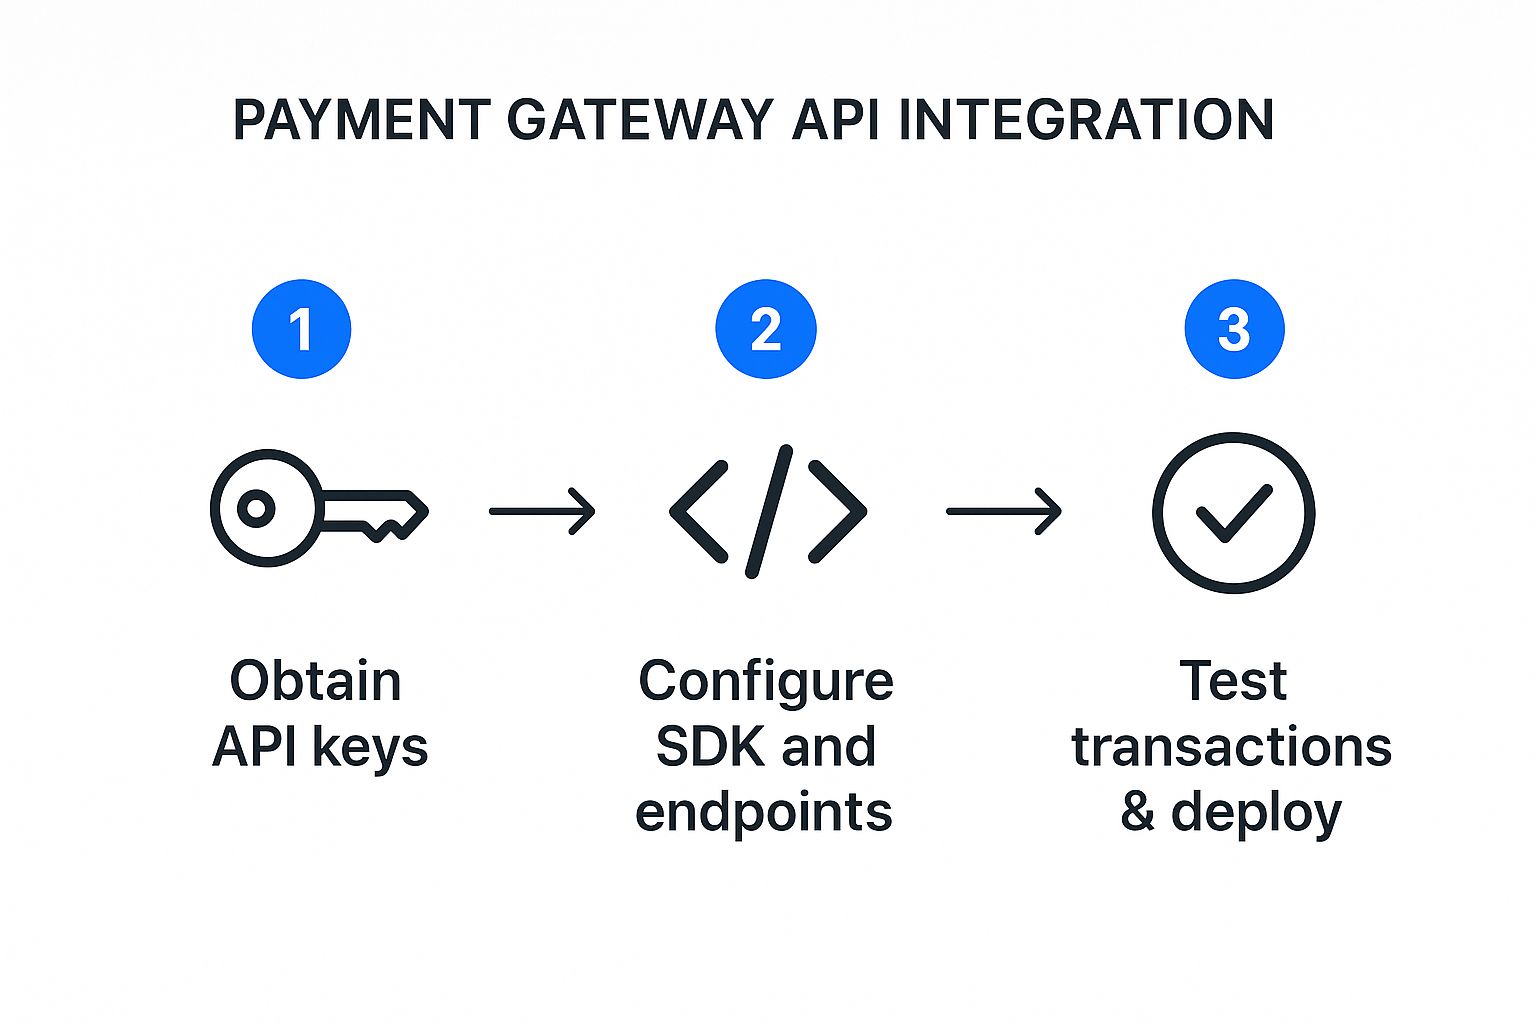
As you can see, it really boils down to three stages. A solid setup and thorough testing are what make the final deployment successful.
Creating a Payment Intent
Every transaction kicks off with a payment intent. Think of it as telling the system, "Hey, I'm about to try and collect some money." It's a server-side API call that creates a record for the transaction, tracking its status from start to finish. You're basically opening a file for a payment before any crypto or cash changes hands.
To get this started, you'll hit the ATLOS /v1/payment_intents endpoint with a few key pieces of information:
- Amount: The total charge, always in the smallest unit (like cents for USD).
- Currency: The standard three-letter ISO code, such as
USDorEUR. - Customer Details: An ID or email to link the payment to a user in your system.
- Payment Method Types: A list of the payment options you'll accept, like
cardorcrypto.
In return, the API gives you a payment intent object containing a unique client_secret. This secret is your golden ticket for the front end. It’s a temporary key that lets the customer's browser securely complete the payment without ever touching your main secret API key.
Handling Client-Side Confirmation
With the client_secret in hand, you pass it from your server over to your front-end checkout page. This is where the ATLOS client-side SDK takes over, using that secret to securely capture and confirm the customer's payment details.
This hand-off is a critical security step. The SDK tokenizes the payment info—whether it's a credit card number or a crypto wallet address—and sends it straight to ATLOS. Your server never even sees the sensitive data. This approach dramatically reduces your PCI compliance headaches and keeps raw payment details far away from your infrastructure.
Once the customer submits, the API processes the payment and sends back a status. Your front-end code needs to be ready to handle the result, either showing a "Success!" message or guiding the user on what to do next if it fails, like suggesting they try another payment method.
A classic rookie mistake is assuming the transaction is done right after the client-side confirmation. Don't fall for it. Many payment methods, especially in the crypto world, are asynchronous. The absolute source of truth is always a server-side webhook notification from ATLOS.
Managing Asynchronous Updates with Webhooks
Since payments aren't always instant, you need a bulletproof way to get the final word on their status. This is exactly what webhooks are for. When a payment's status changes—say, from processing to succeeded—ATLOS automatically pings a URL you've configured on your server.
Your webhook listener's first job is to verify the incoming request's signature to make sure it’s genuinely from ATLOS. Once it's validated, you can safely use the event data (like the payment intent ID) to update your own database and kick off other processes.
This automated flow is what makes a modern e-commerce system tick. You can:
- Mark an order as "paid" in your database.
- Fire off a receipt email to the happy customer.
- Tell your warehouse it's time to start the fulfillment process.
- Automatically update your inventory counts.
Without webhooks, you’d be stuck repeatedly asking the API, "Is it done yet?"—a clunky, inefficient, and unreliable method.
Processing Refunds Through the API
Of course, a complete payment lifecycle includes the ability to send money back. ATLOS has a dedicated API endpoint just for this. To issue a refund, you'll make another server-side call, providing the original payment_intent_id and the amount you want to return.
This kicks off the refund process, and just like with payments, you’ll get webhook notifications to track its status. This keeps your records perfectly synced with the actual flow of funds, closing the loop on your core payment workflows.
Testing Your Integration and Handling Errors
A solid payment gateway API integration isn't just about handling successful payments. The real test is how gracefully your system manages things when they go wrong. This is where you get to put on your QA hat and intentionally try to break things in a controlled setting, long before your customers have a chance to.
Rigorous testing and smart error handling are what separate a professional, trustworthy checkout experience from one that bleeds sales and erodes customer confidence.

It's critical that this entire phase happens exclusively within the ATLOS sandbox environment. Your sandbox API keys are your ticket to a risk-free playground where no real money ever changes hands. You can simulate every possible outcome without a shred of financial risk.
Simulating Real-World Scenarios
Your main goal here is to mimic the messy, unpredictable behavior of real users. The ATLOS sandbox is equipped with specific test card numbers and crypto wallet behaviors designed to trigger a whole range of API responses—not just the successful ones.
You should methodically work through these essential scenarios:
- Successful Payments: This is your baseline. Use the designated "success" test card to confirm your entire workflow is solid. Does the order status update correctly? Does the customer get a receipt?
- Declined Transactions: Now for the important part. Use a test card specifically designed to be declined. How does your system react? It needs to fail gracefully with a clear, helpful message like, "Your card was declined. Please try a different card or contact your bank."
- Insufficient Funds: For crypto payments, what happens when a test wallet doesn't have enough to cover the purchase and the network fees? Your integration needs to catch this and inform the user.
- Authentication Failures: Test what happens when a user fails a 3D Secure check or another authentication step.
Running these simulations ensures your application logic can handle the full spectrum of payment outcomes, not just the "happy path."
Proactive Error Handling and Logging
When an API call fails, the response isn't just an error—it's a breadcrumb trail. The ATLOS API gives you structured error objects, usually with an HTTP status code and a specific error message. Your code has to be built to parse these details, not just throw up a generic "An error occurred" screen.
A vague error message is a dead end for your customer and a guaranteed support ticket for you. The difference between a great user experience and a frustrating one is often as simple as translating a
402 Request Failedwith acard_declinedcode into a human-readable "Your card was declined."
Beyond what the user sees, your backend needs a robust logging system. When an error pops up, you should log the entire API response object, the request that triggered it, and a timestamp. This data is pure gold for debugging. When a customer calls with a problem, you can pull up the exact transaction log and see precisely what happened without any guesswork.
Common API Error Codes and Resolutions
Getting comfortable with common HTTP status codes will save you countless hours of troubleshooting. To help you get started, here’s a quick-reference table for some of the most frequent errors you'll run into while testing your ATLOS integration.
This table is a great starting point for building out your error-handling logic.
| HTTP Status Code | Error Code Name | Common Cause | Recommended Action |
|---|---|---|---|
| 400 Bad Request | parameter_invalid | A required field is missing, or a value is in the wrong format (e.g., an invalid currency code). | Check your request payload against the API documentation to ensure all parameters are correct. |
| 401 Unauthorized | authentication_error | The API key is missing, invalid, or has been revoked. | Verify you are using the correct secret API key in the Authorization header and that it's active. |
| 402 Request Failed | card_declined | The customer's bank has refused the transaction for reasons like insufficient funds or a fraud alert. | Inform the user their card was declined and suggest they use an alternative payment method. |
| 404 Not Found | resource_missing | You're trying to retrieve a resource (like a payment) with an ID that doesn't exist. | Ensure the ID you are referencing is correct and was successfully created in a previous step. |
| 500 Server Error | api_error | A temporary issue has occurred on the ATLOS servers. These are rare but can happen. | Implement a retry mechanism with exponential backoff for these intermittent errors. |
By anticipating these issues and building clear resolutions into your code, you'll create a much more stable and reliable payment system for your users.
Deploying Your Integration and Going Live
After all the hard work and testing in the sandbox, it's finally time to take your integration live. This is the moment your application starts processing real transactions and handling actual money. To make sure everything goes off without a hitch, you'll want to be methodical and rely on a solid checklist.
This is where you shift from a testing mindset to a live operations mindset. It's all about carefully swapping your sandbox credentials for production keys, pointing to your live webhook endpoints, and putting systems in place to keep an eye on your payment processing health.
The Final Pre-Launch Checklist
Before you flip the switch, a final run-through of a deployment checklist is absolutely essential. I can't stress this enough—it's the safety net that catches those small but costly mistakes before they affect your bottom line. Skipping a step here could mean failed payments and a terrible first impression for your customers.
Here’s what should be on your list:
- Switch to Production API Keys: Head over to your ATLOS merchant dashboard and grab your live production keys. Swap out the sandbox ones in your configuration.
- Secure Production Webhook Endpoints: Your live webhook listener needs to be a public URL secured with an HTTPS certificate. Make sure you update this URL in your ATLOS account settings.
- Handle Environment Variables: Double-check that your API keys and webhook secrets are stored as environment variables on your production server. They should never be hardcoded.
- Run One Last Live Test: Process a single, small, real transaction. This verifies the entire flow, from payment to confirmation, is working perfectly in the live environment.
Managing Credentials with Environment Variables
One of the most common and dangerous mistakes I see is developers committing API keys directly into a code repository. Storing your secret API key and webhook signing secret in environment variables isn't just a best practice; it's a fundamental security requirement.
This simple step keeps your code completely separate from your confidential data. It also makes it easy to manage different keys for your development, staging, and production setups without touching a single line of code, which drastically cuts down the risk of an accidental leak.
Think of it this way: you wouldn't leave the keys to your house taped to the front door. Hardcoding API keys is the digital equivalent. Always use environment variables to keep your credentials secure and out of sight.
Monitoring Your Live Integration
Getting your integration live is a huge milestone, but the work doesn't stop there. Consistent monitoring is what keeps your payment system healthy and reliable. The global payment gateway market is booming, expected to hit over $12.81 billion in 2025 and grow at 13.42% through 2033, all thanks to the explosion in digital payments. This trend just underscores how critical a dependable payment system is. For a deeper dive, check out the latest payment gateway market analytics on marketreportanalytics.com.
To catch problems before they snowball, get some proactive monitoring and alerting in place. You'll want to watch a few key things:
- Payment Failure Rates: If you see a sudden jump in failed transactions, it’s a red flag. It could signal a bug in your integration or an issue on the gateway's end.
- API Downtime and Latency: An uptime monitoring tool can be a lifesaver. It’ll alert you immediately if your webhook endpoint or the ATLOS API itself becomes unresponsive.
- Webhook Delivery Failures: Keep an eye on your ATLOS dashboard. It will notify you of any failing webhooks, which usually means your server is down or has a configuration issue.
Putting these simple checks in place lets you spot and fix issues fast, making sure your payment gateway integration continues to be a rock-solid engine for your business.
Got Questions? We've Got Answers
Even the most straightforward integration can bring up a few questions.Here are some of the most common things developers and business owners ask when they're getting set up.
Hosted vs. Integrated Gateways: What's the Difference?
You’ll often hear these two terms, and the distinction is pretty important.
A hosted gateway is the simpler path. It whisks your customer away to a separate, secure page hosted by the payment provider to finish their transaction. The big win here is simplified PCI compliance, as you never handle the sensitive data yourself.
An integrated gateway, like the ATLOS API we've been discussing, keeps the customer on your site the entire time. It's a bit more work on the development side, but the payoff is huge: a seamless, branded checkout experience that you control from start to finish.
How Do I Handle PCI Compliance with an API Integration?
This is a big one, but thankfully, modern gateways like ATLOS are built to make this much easier. The key is something called client-side tokenization.
This process ensures sensitive data (like card numbers or crypto wallet details) goes directly from the customer's browser to the gateway's secure servers. It never even touches your server, which dramatically shrinks your compliance scope.
Your main jobs for compliance boil down to this: guard your secret API keys like they're gold, make sure your payment pages are always served over HTTPS, and fill out the required Self-Assessment Questionnaire (SAQ).
Can I Really Use Just One API for All Payment Types?
Yes, absolutely. That’s the beauty of a well-designed API. A single integration with the ATLOS API is designed to be payment-agnostic, meaning you don't have to write new code every time you want to add a new way for people to pay.
With one setup, you can easily manage payments from:
- Standard credit and debit cards
- Digital wallets like Apple Pay or Google Pay
- A whole range of cryptocurrencies, from Bitcoin to Ethereum
Best of all, you can typically flip these payment options on or off right from your merchant dashboard. It gives you the freedom to adapt as your business and your customers' preferences evolve.
What Exactly Are Webhooks, and Why Do I Need Them?
Think of webhooks as real-time alerts from the payment gateway to your application. They're automated messages that fire off the instant something important happens. For a payment gateway API integration, they're not just a nice-to-have; they're essential.
Let's say a crypto transaction goes from pending to succeeded. Instead of you having to constantly ask the API, "Is it done yet?", the gateway proactively sends a webhook to your server. This lets you trigger immediate actions like updating the order status in your database, firing off a confirmation email, or adjusting your inventory. Without webhooks, you’d be stuck in a slow, inefficient loop of constantly checking for updates.
Ready to build a seamless crypto payment experience with a powerful, developer-friendly API? ATLOS Crypto Payment Gateway provides a direct-to-wallet, no-KYC solution designed for quick setup and maximum control. Start accepting crypto payments today with ATLOS.